Friday, June 29, 2012

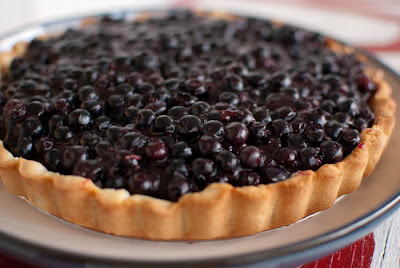
Refreshing Blueberry Tart

So, who loves blueberries?? I know I do. I was wanting to make a blueberry dessert, but didn't want a hot one since it's been so hot outside. So a Blueberry Tart was the perfect dessert to make.

First, you need a baked tart. I used Smitten Kitchen's "Great Unshrinkable Sweet Tart Shell" recipe. It eliminates the need for pie weights, and was SO yummy. If you don't have time to make your own shell, I'm pretty sure you can buy the frozen version.

There are 2 layers that will go in the tart.

 For the first layer, mix 6 tablespoons of softened cream cheese (that's 3 oz. so you don't have to look it up like I did :) ), with 1/4 c sugar and 1 teaspoon of vanilla. Once it is mixed (I just used a spoon and it mixed well) spread it in the bottom of the tart shell.

Now, for the blueberry part! Wash your 3 cups of berries (that you purchased from Taylor's Produce, of course) and set them aside.

Next, put 1 cup of the berries in a pan with 1/4 cup water, 1/4 cup sugar and 2 T cornstarch that was dissolved in 2 T of warm water. Let it come to a boil, then turn it back to simmer right away. The heat will cause the berries to burst (I also mashed mine a little to help them along.)

 Let it simmer until it gets thicker, and is all blueberry color. (as pictured below) 

Mix the remaining 2 cups of berries with the cooked berries and then pour into your tart shell.

You are ready to eat! I stuck mine in the fridge and it made it super refreshing. It got thumbs up from everyone who ate it!
Based on a recipe I found here.

Wednesday, June 27, 2012

Grilled Corn...2 ways.

So how do you cook your Taylor corn? I've lived most of my life eating sweet corn at least once a day during the summer. But in all that time, I'd never had grilled corn on the cob. I decided to change that.

I found multiple sites with directions online and decided to give them a try. Method #1 is an herb butter corn. First, peel off a few of the outer layers of the corn. Make sure to leave a few for protection. This photo is the before and after of removing the outer layers.

2. Cut off the tip of the silk end. (I think this just helps it be less messy)

3. Soak in cold water for 15-20 minutes.

I couldn't get it to stay under the water (it kept floating) so this was my solution to keep it under water!

4. Remove the corn from the water and husk it back to about 1 inch from the base. We need the husk to stay attached, and if it gets pulled all the way back it won't stay attached. I'll be honest, it took 4 tries for me to get 2 ears done correctly.
5. Smear the corn with an herb butter. (just soften butter, and throw in your favorite herbs. I used parsley and basil.)

5. Wrap the husk back around the ear and secure with kitchen string. Or, if you are like me and don't have kitchen string, aluminum-foil-turned-twisty-tie works just fine!
6. Grill over high heat for 15-20 minutes, turning occasionally.

Now, if you want to grill corn and don't have time to do the soaking and the husking and the smearing and the tieing and the cooking, here is method #2 (which is much simpler).

Step 1. Don't husk at all. Don't soak. Just cut the silk end off the ear.

Step 2. Throw it on the grill and cook for 15--20 minutes, turning occasionally. That's it!!


We tried both versions of grilled corn, and found we liked Method #2 (the less work one) even better than the one with herb butter. I think that if I loved the herb butter enough, it could always be added after cooking to save the middle steps of husking, smearing and re-wrapping.


It does take longer than my standard method of boiling corn, BUT if we're already grilling, it makes sense to put it on the grill too. If you try it, come back and let us know how you liked it!

Thursday, June 21, 2012

PW's Fresh Green Beans

So, you've purchased your green beans from Taylor's Produce, and now need to decide what to do with them? If you are like me, sometimes it is nice to do something other than boil them. I found this recipe from Pioneer Woman and gave it a try.

While I was making this, I didn't really think the taste difference would be worth the few extra steps it takes. Boy, was I wrong!! These were SO. so. SO. delicious. You must try them soon!


Here's what you need: (actually, you only need table salt OR kosher salt...I didn't read thoroughly...)
 1 lb green beans
1 cup chopped onion
2 cloves garlic
1/2 cup chopped red bell pepper
2 tablespoons bacon grease (can substitute 1 T butter and 1 T olive oil)
1 cup chicken broth
1/2 to 1 teaspoon kosher salt (can substitute regular table salt; use 1/4 to 1/2 teaspoon)
Ground black pepper
 1. Wash thoroughly and snap the ends of the green beans.

2. Melt the bacon grease (or butter, or oil) in the skillet on medium heat.

3. Add garlic and onions. Cook for a minute or two.

4. Add green beans and cook for a minute. The beans should turn bright green after a minute or two.

5. Add chicken broth, chopped red pepper, salt and black pepper. Turn heat to low and cover with a lid. (make sure the lid is cracked, so steam can escape.)


6. Cook for 20 to 30 minutes or until liquid evaporates. Beans should be soft, but still crisp.
Give it a try and let us know what you think! These are definitely going in my regular recipe rotation!