Sunday, August 26, 2012

Cheesy Squash Casserole

I made this casserole recently for a potluck and it was a hit! It is topped with crumbled Ritz crackers and according to my husband "Anything is better if you put Ritz on top!).

I followed this recipe, surprisingly not too much butter since it's a Paula D recipe!

Ingredients

  • 6 cups large diced yellow squash and zucchini
  • Vegetable oil
  • 1 large onion, chopped
  • 4 tablespoons butter
  • 1/2 cup sour cream
  • 3/4 tsp. salt
  • 1/4 tsp. garlic powder
  • 1/4 tsp. black pepper
  • 1 cup grated cheddar cheese
  • 1 cup crushed butter crackers (recommended: Ritz)
*Preheat oven to 350 degrees

1. Cut squash and onion. We used the nifty mandolin cutter my MIL gave us for Christmas, but you can cut them up the regular way.
2. Saute the squash with a little olive oil for 15 to 20 minutes.
3. In a separate skillet, saute the onion in butter for 5 minutes.
4.(This step is verbatim from her recipe, hence the quotes.) "Line a colander with a clean tea towel. Place the cooked squash in the lined colander. Squeeze excess moisture from the squash. Set aside." I'll be real here, I didn't get how to squeeze the liquid out without burning myself in the process. So I just squished it a little with a spoon and it worked just fine!

5. Next, mix all the ingredients (except crackers) together in a large bowl. Put the mixture in a buttered casserole dish (I used a 9x13).

6. Top with cracker crumbles.

7. Bake for 25-30 minutes.
8. Devour the yumminess!

Wednesday, August 15, 2012

A Taylor Family Favorite--Peach Cobbler

I was in such a hurry to make this that I forgot the step-by-step photos...oops!

But it's simple and delicious {which means it's right up my alley!}.

Mom's Peach Cobbler Recipe
1/2 to 1 stick of butter, melted in the bottom of a 9x13 baking dish
5-6 cups sliced peaches
Add 3/4 cup of sugar to the peaches and mix; pour in baking dish.
In a separate bowl, mix 1 cup flour, 1 cup sugar, 1 cup milk, 1 Tablespoon baking poweder and a dash of salt. Mix well.

Pour flour mixture over peaches. DO NOT STIR!

Bake at 325 degrees for 1 hour and 10 minutes


Thursday, August 9, 2012

Zucchini Corn Quesadillas

I found this recipe on Pinterest and thought it was worth a shot. Turns out, I really enjoyed it! Here's the original recipe.

My version makes 3 (rather full) quesadillas.

2 Tablespoons olive oil
2 small-medium zucchini, sliced thin
2 ears of corn, cut off the cob
1/2 cup chopped onion
2 cloves garlic, minced
salt and pepper to taste
1 cup grated pepper jack cheese
6 tortillas (I used wheat tortillas) 8  in. size

1. Preheat your oven to 400 degrees.

2. Heat the olive oil in a pan over medium heat and sautee the zucchini, corn and onion. (around 6-10 minutes, or until zucchini is tender) Add the garlic, salt and pepper and cook another minute.
 It helps if your salt and pepper shakers are super cute ears of corn :)
 I tend to err on the side of zucchini that is really done (aka mushy) but how long you cook it is all up to you!
 3. Lay a tortilla on a baking sheet, then add your filling and cheese. Then put the top tortilla on.
 4. Bake for 10 minutes, turning halfway through. (If someone has a tip for flipping these neatly, I'm all ears. I had corn fly everywhere!)

5. Let it sit a few minutes when you take it out, then cut into wedges and serve! I'm sure it would be good topped with some sour cream, or maybe even salsa. I honestly didn't think I'd like this as much as I did!


Tuesday, July 31, 2012

Roasted Tomatoes

These tomatoes are super quick and easy to make.

 You can find the recipe HERE.


Wednesday, July 25, 2012

Basic Sauteed Squash

Today's recipe isn't an exact science, and is one that is easily tailored to your taste. (see how I inserted tailored...kinda like Taylor...hehe) Anyhow, sauteed squash was (and still is) a summer staple with the Taylor family.

Here's what you need. Butter/margarine, onion, pepper, squash, salt and pepper.

 Chop the squash, onion and pepper.
 Put it in the pan over medium heat. Add salt, pepper and some butter. (obviously the more butter the better it tastes, but if you're going for health just use a couple tablespoons)
 Cook over medium heat, stirring occasionally until squash is tender. I usually cover it for most of the cooking time so the juices stay.
 And you have a wonderful side dish!! I love that there are lots of variations to this basic recipe. Mom always stuck with squash, zucchini and onion. I find the peppers add nice color if you are only making squash. I usually keep the spices basic with salt and pepper, but adding garlic is a yummy option too!

Friday, July 20, 2012

Peach Quick Bread {or muffins!}

Today's recipe comes from one of our favorite bakers, Mina Pincus. She was kind enough to share this Peach quick bread recipe with us. This can also be made into muffins!


Peach Quick Bread

Makes 3 loaves (can also be made into muffins)

3 ½ cups flour
2 teaspoons baking powder
2 teaspoons cinnamon
¼ teaspoon nutmeg
1 teaspoon baking soda
¼ teaspoon salt
1 cup butter
1 cup sugar
2/3 cup brown sugar
4 eggs
¼ cup honey
2 teaspoons vanilla
1 cup milk
3 cups diced peaches

Topping
¾ cup quick oats
1 cup brown sugar
2 tablespoons butter or margarine


Combine flour, baking powder, cinnamon, baking soda, and salt in a bowl.  Set aside.

Combine topping ingredients in a separate bowl and set aside.

Cream butter and sugars; add eggs one at a time mixing after each.  Add honey and vanilla and mix well.

Add flour mixture alternately with milk beginning and ending with dry ingredients.

Fold in diced peaches.  Pour into greased loaf pan and sprinkle topping mixture over the batter. 

Bake at 350 degrees for 35-40 minutes or until a toothpick inserted into the center comes out clean.  (If baking muffins, bake for 18-20 minutes.) 

And viola!! You have delicious and easy peach bread!  {And I'll tell you a little secret...the soft peaches that are best for baking, are often much cheaper at the stand than the harder ones!} So let's get to baking everybody!

Tuesday, July 10, 2012

Marinated Tomatoes

After seeing the red and yellow grape tomatoes at the stand the other day, I knew I needed to make some type of marinated tomato salad. There are tons of variations of this online. I'll have to post my mom's recipe for marinated tomatoes sometime soon too.

For this recipe, get some tomatoes. (regular tomatoes, cut up would work just fine also) I used a pint of red and a pint of yellow. Make sure you wash them thoroughly!

Next, get out olive oil, red wine vinegar, basil and garlic.


Now, this part isn't an exact science. I used all the basil pictured + 2 cloves of garlic. For the oil/vinegar, mix together in a 1:1 ratio. (I used 3/4 c of each) Whisk it all together. (it looks gross right now, doesn't it?)


Next, pause to let the cat out onto the porch 'cause he's been sitting and whining at the door long enough to drive you nuts.

Wait. What? That's only at my house???

Once your liquid is whisked together (and the cat is on the porch) cut your grape tomatoes in half and add them to the marinade. Stir.

 Refrigerate for 3-4 hours or overnight. (if you're impatient like I am, they are certainly edible after only marinating for 20 minutes, but they are better if you give them a couple hours.)


Lastly, eat up!


Another tomato recipe I hope to try soon is found here.

Sunday, July 8, 2012

Grilled Zucchini

Super easy and quick recipe today. (It's so easy, you can hardly call it a recipe) Wash your zucchini, then cut it in half (or into quarters if you want it to cook a little faster).


 Brush all sides with Olive Oil, then season it however you'd like. You can just use salt and pepper, I used salt, pepper and Montreal Chicken seasoning. De-lish.

 Ready for the grill...


Grill for 5 minutes.

 Flip. (not you, the zucchini...no somersaults near the grill...)

Grill 5 more minutes.


This is a great way to make your meal completely grill-prepared. No heating up the kitchen for this meal of burgers, corn and zucchini!!

Friday, June 29, 2012

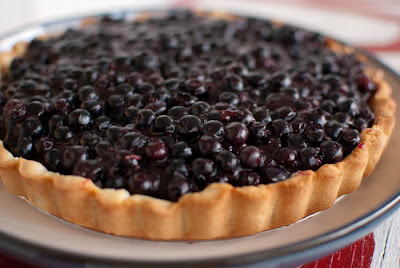
Refreshing Blueberry Tart

So, who loves blueberries?? I know I do. I was wanting to make a blueberry dessert, but didn't want a hot one since it's been so hot outside. So a Blueberry Tart was the perfect dessert to make.

First, you need a baked tart. I used Smitten Kitchen's "Great Unshrinkable Sweet Tart Shell" recipe. It eliminates the need for pie weights, and was SO yummy. If you don't have time to make your own shell, I'm pretty sure you can buy the frozen version.

There are 2 layers that will go in the tart.

 For the first layer, mix 6 tablespoons of softened cream cheese (that's 3 oz. so you don't have to look it up like I did :) ), with 1/4 c sugar and 1 teaspoon of vanilla. Once it is mixed (I just used a spoon and it mixed well) spread it in the bottom of the tart shell.

Now, for the blueberry part! Wash your 3 cups of berries (that you purchased from Taylor's Produce, of course) and set them aside.

Next, put 1 cup of the berries in a pan with 1/4 cup water, 1/4 cup sugar and 2 T cornstarch that was dissolved in 2 T of warm water. Let it come to a boil, then turn it back to simmer right away. The heat will cause the berries to burst (I also mashed mine a little to help them along.)

 Let it simmer until it gets thicker, and is all blueberry color. (as pictured below) 

Mix the remaining 2 cups of berries with the cooked berries and then pour into your tart shell.

You are ready to eat! I stuck mine in the fridge and it made it super refreshing. It got thumbs up from everyone who ate it!
Based on a recipe I found here.

Wednesday, June 27, 2012

Grilled Corn...2 ways.

So how do you cook your Taylor corn? I've lived most of my life eating sweet corn at least once a day during the summer. But in all that time, I'd never had grilled corn on the cob. I decided to change that.

I found multiple sites with directions online and decided to give them a try. Method #1 is an herb butter corn. First, peel off a few of the outer layers of the corn. Make sure to leave a few for protection. This photo is the before and after of removing the outer layers.

2. Cut off the tip of the silk end. (I think this just helps it be less messy)

3. Soak in cold water for 15-20 minutes.

I couldn't get it to stay under the water (it kept floating) so this was my solution to keep it under water!

4. Remove the corn from the water and husk it back to about 1 inch from the base. We need the husk to stay attached, and if it gets pulled all the way back it won't stay attached. I'll be honest, it took 4 tries for me to get 2 ears done correctly.
5. Smear the corn with an herb butter. (just soften butter, and throw in your favorite herbs. I used parsley and basil.)

5. Wrap the husk back around the ear and secure with kitchen string. Or, if you are like me and don't have kitchen string, aluminum-foil-turned-twisty-tie works just fine!
6. Grill over high heat for 15-20 minutes, turning occasionally.

Now, if you want to grill corn and don't have time to do the soaking and the husking and the smearing and the tieing and the cooking, here is method #2 (which is much simpler).

Step 1. Don't husk at all. Don't soak. Just cut the silk end off the ear.

Step 2. Throw it on the grill and cook for 15--20 minutes, turning occasionally. That's it!!


We tried both versions of grilled corn, and found we liked Method #2 (the less work one) even better than the one with herb butter. I think that if I loved the herb butter enough, it could always be added after cooking to save the middle steps of husking, smearing and re-wrapping.


It does take longer than my standard method of boiling corn, BUT if we're already grilling, it makes sense to put it on the grill too. If you try it, come back and let us know how you liked it!

Thursday, June 21, 2012

PW's Fresh Green Beans

So, you've purchased your green beans from Taylor's Produce, and now need to decide what to do with them? If you are like me, sometimes it is nice to do something other than boil them. I found this recipe from Pioneer Woman and gave it a try.

While I was making this, I didn't really think the taste difference would be worth the few extra steps it takes. Boy, was I wrong!! These were SO. so. SO. delicious. You must try them soon!


Here's what you need: (actually, you only need table salt OR kosher salt...I didn't read thoroughly...)
 1 lb green beans
1 cup chopped onion
2 cloves garlic
1/2 cup chopped red bell pepper
2 tablespoons bacon grease (can substitute 1 T butter and 1 T olive oil)
1 cup chicken broth
1/2 to 1 teaspoon kosher salt (can substitute regular table salt; use 1/4 to 1/2 teaspoon)
Ground black pepper
 1. Wash thoroughly and snap the ends of the green beans.

2. Melt the bacon grease (or butter, or oil) in the skillet on medium heat.

3. Add garlic and onions. Cook for a minute or two.

4. Add green beans and cook for a minute. The beans should turn bright green after a minute or two.

5. Add chicken broth, chopped red pepper, salt and black pepper. Turn heat to low and cover with a lid. (make sure the lid is cracked, so steam can escape.)


6. Cook for 20 to 30 minutes or until liquid evaporates. Beans should be soft, but still crisp.
Give it a try and let us know what you think! These are definitely going in my regular recipe rotation!